Configuring user environments#
Deploying JupyterHub means you are providing Jupyter notebook environments for multiple users. Often, this includes a desire to configure the user environment in some way.
Since the jupyterhub-singleuser server extends the standard Jupyter notebook
server, most configuration and documentation that applies to Jupyter Notebook
applies to the single-user environments. Configuration of user environments
typically does not occur through JupyterHub itself, but rather through system-
wide configuration of Jupyter, which is inherited by jupyterhub-singleuser.
Tip: When searching for configuration tips for JupyterHub user environments, try removing JupyterHub from your search because there are a lot more people out there configuring Jupyter than JupyterHub and the configuration is the same.
This section will focus on user environments, including:
Installing packages
Configuring Jupyter and IPython
Installing kernelspecs
Using containers vs. multi-user hosts
Installing packages#
To make packages available to users, you generally will install packages system-wide or in a shared environment.
This installation location should always be in the same environment that
jupyterhub-singleuser itself is installed in, and must be readable and
executable by your users. If you want users to be able to install additional
packages, it must also be writable by your users.
If you are using a standard system Python install, you would use:
sudo python3 -m pip install numpy
to install the numpy package in the default system Python 3 environment
(typically /usr/local).
You may also use conda to install packages. If you do, you should make sure that the conda environment has appropriate permissions for users to be able to run Python code in the env.
Configuring Jupyter and IPython#
Jupyter and IPython have their own configuration systems.
As a JupyterHub administrator, you will typically want to install and configure environments for all JupyterHub users. For example, you wish for each student in a class to have the same user environment configuration.
Jupyter and IPython support “system-wide” locations for configuration, which is the logical place to put global configuration that you want to affect all users. It’s generally more efficient to configure user environments “system-wide”, and it’s a good idea to avoid creating files in users’ home directories.
The typical locations for these config files are:
system-wide in
/etc/{jupyter|ipython}env-wide (environment wide) in
{sys.prefix}/etc/{jupyter|ipython}.
Example: Enable an extension system-wide#
For example, to enable the cython IPython extension for all of your users,
create the file /etc/ipython/ipython_config.py:
c.InteractiveShellApp.extensions.append("cython")
Example: Enable a Jupyter notebook configuration setting for all users#
Note
These examples configure the Jupyter ServerApp, which is used by JupyterLab, the default in JupyterHub 2.0.
If you are using the classing Jupyter Notebook server, the same things should work, with the following substitutions:
Where you see
jupyter_server_config, usejupyter_notebook_configWhere you see
NotebookApp, useServerApp
To enable Jupyter notebook’s internal idle-shutdown behavior (requires
notebook ≥ 5.4), set the following in the /etc/jupyter/jupyter_server_config.py
file:
# shutdown the server after no activity for an hour
c.ServerApp.shutdown_no_activity_timeout = 60 * 60
# shutdown kernels after no activity for 20 minutes
c.MappingKernelManager.cull_idle_timeout = 20 * 60
# check for idle kernels every two minutes
c.MappingKernelManager.cull_interval = 2 * 60
Installing kernelspecs#
You may have multiple Jupyter kernels installed and want to make sure that
they are available to all of your users. This means installing kernelspecs
either system-wide (e.g. in /usr/local/) or in the sys.prefix of JupyterHub
itself.
Jupyter kernelspec installation is system wide by default, but some kernels may default to installing kernelspecs in your home directory. These will need to be moved system-wide to ensure that they are accessible.
You can see where your kernelspecs are with:
jupyter kernelspec list
Example: Installing kernels system-wide#
Assuming I have a Python 2 and Python 3 environment that I want to make sure are available, I can install their specs system-wide (in /usr/local) with:
/path/to/python3 -m ipykernel install --prefix=/usr/local
/path/to/python2 -m ipykernel install --prefix=/usr/local
Multi-user hosts vs. Containers#
There are two broad categories of user environments that depend on what Spawner you choose:
Multi-user hosts (shared system)
Container-based
How you configure user environments for each category can differ a bit depending on what Spawner you are using.
The first category is a shared system (multi-user host) where
each user has a JupyterHub account and a home directory as well as being
a real system user. In this example, shared configuration and installation
must be in a ‘system-wide’ location, such as /etc/ or /usr/local
or a custom prefix such as /opt/conda.
When JupyterHub uses container-based Spawners (e.g. KubeSpawner or DockerSpawner), the ‘system-wide’ environment is really the container image which you are using for users.
In both cases, you want to avoid putting configuration in user home directories because users can change those configuration settings. Also, home directories typically persist once they are created, so they are difficult for admins to update later.
Named servers#
By default, in a JupyterHub deployment each user has exactly one server.
JupyterHub can, however, have multiple servers per user. This is most useful in deployments where users can configure the environment in which their server will start (e.g. resource requests on an HPC cluster), so that a given user can have multiple configurations running at the same time, without having to stop and restart their one server.
To allow named servers:
c.JupyterHub.allow_named_servers = True
Named servers were implemented in the REST API in JupyterHub 0.8, and JupyterHub 1.0 introduces UI for managing named servers via the user home page:
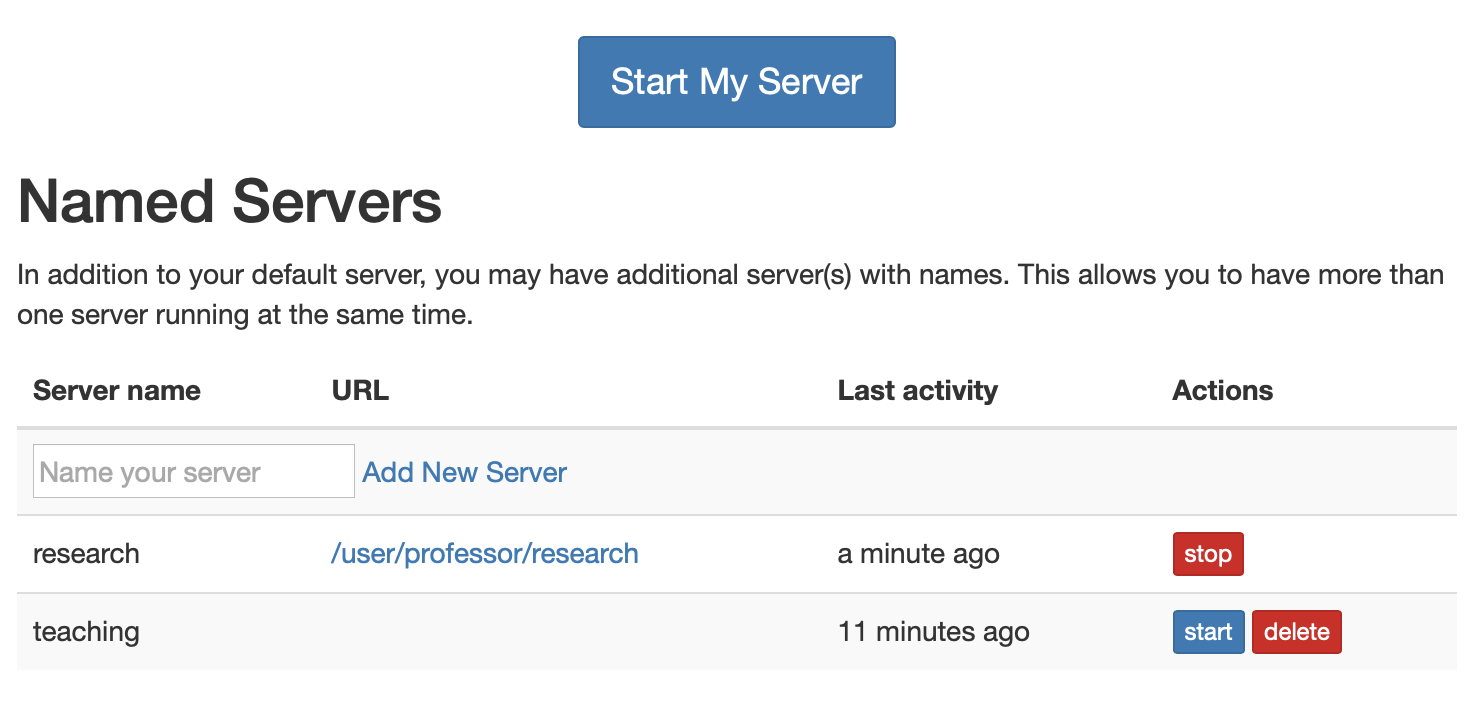
as well as the admin page:
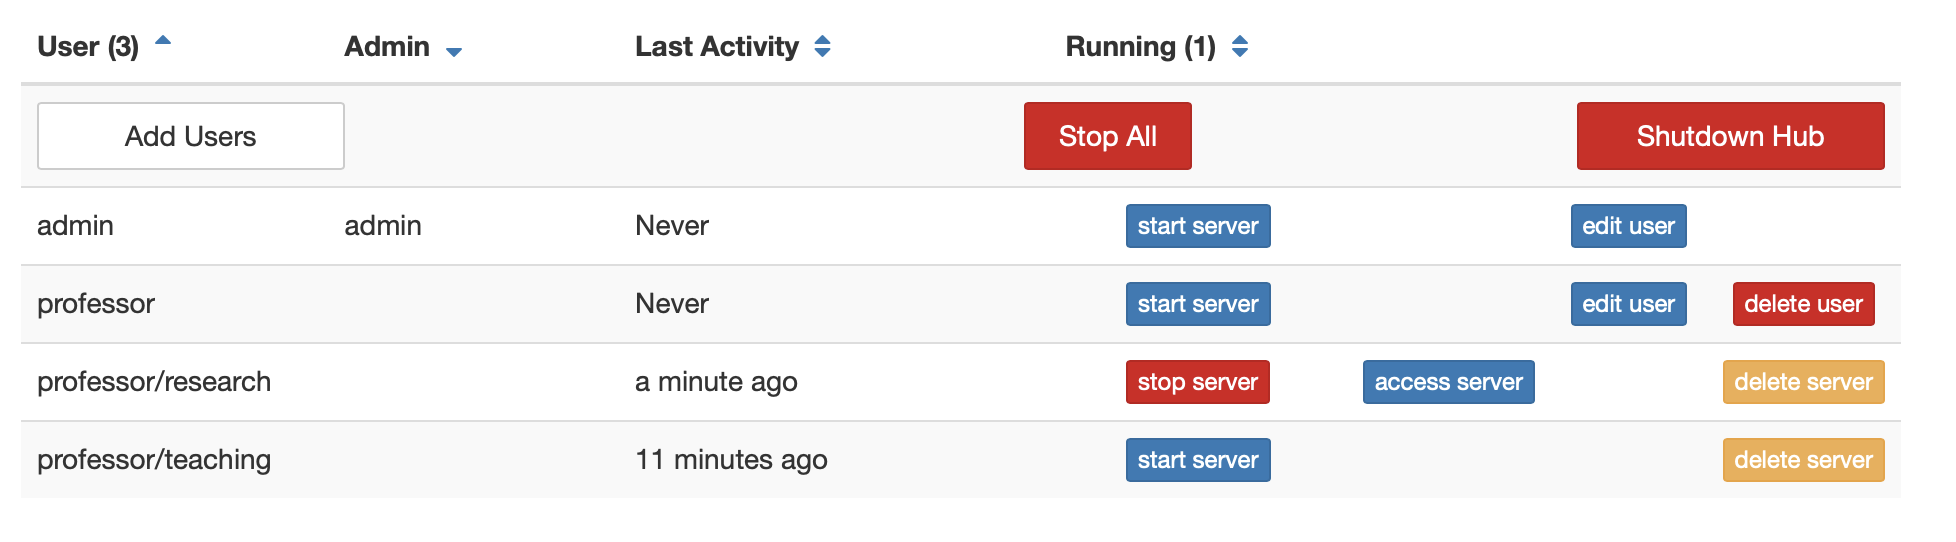
Named servers can be accessed, created, started, stopped, and deleted from these pages. Activity tracking is now per-server as well.
The number of named servers per user can be limited by setting
c.JupyterHub.named_server_limit_per_user = 5
Switching back to classic notebook#
By default the single-user server launches JupyterLab,
which is based on Jupyter Server.
This is the default server when running JupyterHub ≥ 2.0.
You can switch to using the legacy Jupyter Notebook server by setting the JUPYTERHUB_SINGLEUSER_APP environment variable
(in the single-user environment) to:
export JUPYTERHUB_SINGLEUSER_APP='notebook.notebookapp.NotebookApp'
Changed in version 2.0: JupyterLab is now the default singleuser UI, if available,
which is based on the Jupyter Server,
no longer the legacy Jupyter Notebook server.
JupyterHub prior to 2.0 launched the legacy notebook server (jupyter notebook),
and Jupyter server could be selected by specifying
# jupyterhub_config.py
c.Spawner.cmd = ["jupyter-labhub"]
or for an otherwise customized Jupyter Server app, set the environment variable:
export JUPYTERHUB_SINGLEUSER_APP='jupyter_server.serverapp.ServerApp'